Download and install vmware tools in Ubuntu linux

A simple step by step tutorial to install VMware tools in Ubuntu linux server in command line. It works with all the version of Ubuntu servers including the Latest Ubuntu 14.10.
Follow the detailed guide here 

Recover data after accidental format with 100% success rate

Data recovery after accidental format. With 100% success rate..
Read more

Recover Deleted Data From Yosemite

Lost or accidentaly deleted an important file or folder ?
Dont worry it is possible to revover pictures, videos, documents, pdf, audio mp3 files, emails or any other type of files?  You can now recover deleted file from your all new mac OS X Yosmite 10.10 for free even it is deleted from trash.

Its common to delete files accidentaly and you may worry about recovering the lost file. There are many data revovery softwares which comes free and paid in the market (Internet). some ask for a payment, and some recover a part of the file and/or ask to upgrage to premium version with a payment, and some give us the exat file.

Improving the chance of Data Recovery.

It is always very important that, you should try to recover the accidentaly deleted data as soon as possible after deleting it. You shouldn't make much change in the hard disk or USB pendrive that means do not write/save more files, of changing the current folder structure, etc. The possibility of data revovery will decrease if you overwrite more file in the same Dard disk.

With this Reviewed Apps you can also recover deleted file from SD Card, USB drives, pendrives, and memory cards.

Free file recovery softwares for Mac OS X Yosemite 10.10.
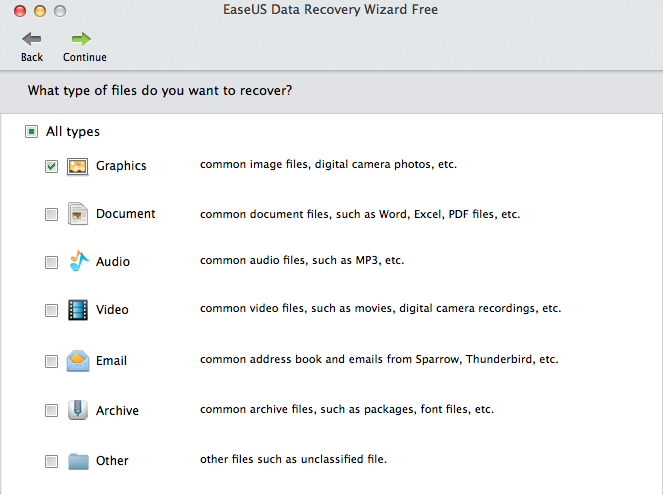
#1. Data Recovery Wizard.
      Its a completely free data recovery software for mac os x yosemite 10.10. You have to download the .dmg image from the link below

DOWNLOAD DATA RECOVERY WIZARD (Read above instructions for better recovery)

After installing the "Data recovery wizard"app, launch the program and in the first window you should select the file type to recover. If you accidentaly deleted a picture such as .JPG, .BMP, .PNG, etc from the desktop, you should select the "GRAPHICS" option only. So the software will not search for any other type of files and it will boost the recovery speed so quickly. Then click Continue.


Now Select the Disc you need to scan, You can now try to recover file from system HDD or from pendrive. And click Scan. Here in my case, my HDD is Unlitled 500GB TOSHIBA HDD
And now it will list all the available or recoverable files that deleted from your Macbook. You can select the files and select the destination folder to recover and save.

Thank you.

How to make a Bootable USB Installer of Yosemite 10.10

           I know you will be eager to try the newly released OS X Yosemite 10.10.  If you are already download the Yosemite installer app from the App Store, then proceed to the bootable usb creation steps, otherwise download yosemite installer first.

After downloading the app, you will need the following.
1. A USB drive with minimum 8GB
2. A Mac running machine.
3. The downloaded OS X Yosemite 10.10 .app file (saved in the folder "/Applications/")

Now you are all set for making the bootable USB drive of OS X Yosemite.

Note: In this post, the USB storage name is "SANDISK" , and the Yosemite installer App file is reside in the folder as "/Applications/Install OS X Yosemite.app"

Step 1.
First Format the USB drive to "Mac OS Extended (Journaled)"
for this, Connect the USB drive to your existing Mac and goto "Disk Utility" and select the USB drive and under the "Erase" tab, you can format the drive.

Step 2.
Open the application "Terminal" and run the following command (Better copy and paste the command and edit the file path and USB drive path).

sudo /Applications/Install\ OS\ X\ Yosemite.app/Contents/Resources/createinstallmedia --volume /Volumes/SANDISK --applicationpath /Applications/Install\ OS\ X\ Yosemite.app --nointeraction

This will make the USB drive a Yosemite bootable installer. You should change the USB drive name and the path of Yosemite installer app in your command. It may take 15 to 20 minutes depending on your USB data read/write speed. When the terminal says "Done" you are all done and ready to install and try the Mac OS X Yosemite 10.10.

Thanks for reading, and please leave your comments below. :D

Related Posts Plugin for WordPress, Blogger...

 
Design by Free WordPress Themes | Bloggerized by Lasantha - Premium Blogger Themes | Bluehost Coupons